Page 4 of 6 ... January 2004 - March 2005
January 2004 -- Seats and Doors
The seats are at the upholstery shop. I'm having them redone in cloth instead of vinyl. The vinyl was too hot and uncomfortable on warm summer days.
I've also started working on the doors. I have the glass, hardware, and other parts removed from the passenger side door and will soon be cutting off the rusty section of lower door skin and welding on the new patch panel.
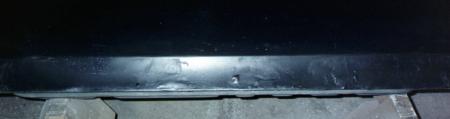
This photo shows the rust bubbling up through the old bondo along the lower edge of the passenger side door. The driver side door looks about the same.
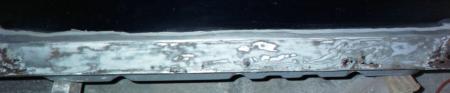
Here is the bottom edge of the passenger side door with all the old paint and bondo stripped off to reveal lots of rust holes.
July 2004 -- Finishing the Doors
I had planned on finishing the doors over the winter but I got busy with some other projects instead. So now I am finally getting around to cutting out the rusty areas and welding in the patch panels.
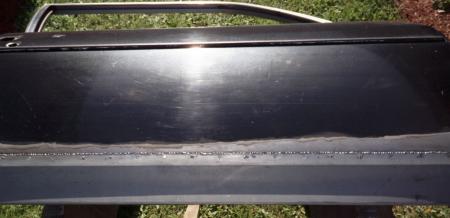
Here's the passenger side door with the new patch panel welded into place. The shadow in this photo shows a bow in the door that resulted from doing the cutting and welding with the door laying on it's side. I didn't notice it until I had it all welded. So I had to cut the weld seam back apart, push it into position, and re-weld. I used a flanged lap joint where the old and new panels meet (instead of a butt weld). So there was enough overlap to re-position the panel and re-weld without having to add a narrow filler strip or start over with a new patch panel.
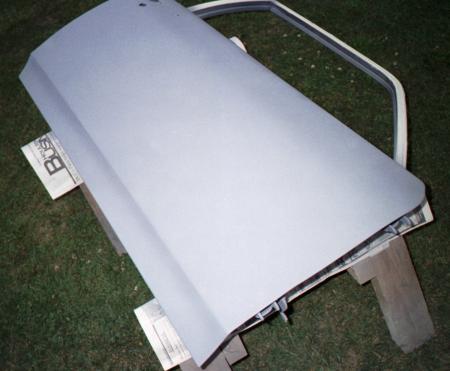
And here's the primered door ready to be put back on the car. I used an angle grinder with a "flap disk" to grind down the weld. I've found that these work much better than the rigid grinding stones for sheetmetal/body work because they don't gouge into the surrounding metal. After grinding, I applied a skim coat of Evercoat Everglass filler over the weld seam and coated the inside of the patched area with Evercoat undercoating. Then I finished stripping the old black paint off the rest of the door, filled some minor door dings with body filler, sanded it all smooth, and sprayed on a coat of Nason Ful-Poxy epoxy primer followed by a couple coats of Select-Primer 2K primer/surfacer. Finally, I repeated the whole process with the driver side door, this time checking for bow/straightness of the body line before welding.
August 2004 -- New Seat Upholstery
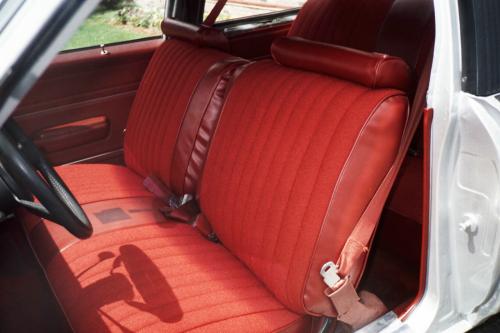
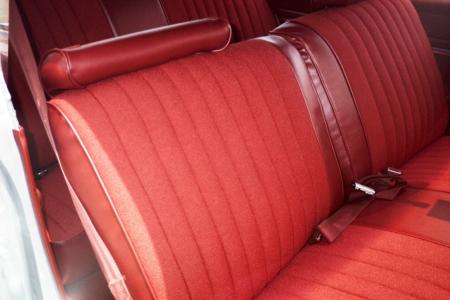
The newly re-upholstered seats are back in the car. What an improvement in terms of both looks & comfort! The above photos also show the freshly re-painted door jambs. While I had the doors off, I took the opportunity to strip the old black paint from the door jamb areas and re-paint them with the silver metallic that I'll eventually use on the whole car. When I put the doors back on, I also installed some new weatherstrip, glass run channel, and window felts ... no more wind whistling in around the doors & windows!
August 7, 2004 -- Another Parts Car
As I had mentioned back on Page 1, a guy here in town had hit a moose with his 78 4-door Nova and I gave him a roof and some other parts off my 76 4-door in exchange for him hauling it home. He welded the roof on and then gave up on the project so I bought it for parts.
This parts car has some really nice looking bumpers that I plan on using on my 77. The moose legs didn't hurt the front one a bit. It also has a tilt steering column that I will be swapping into my 77 as well. After bringing it home and taking a closer look under the car I was surprised to discover that it has an 8.5" 10-bolt rearend (most 76-79 6-cyl Novas had the smaller 7.5" 10-bolt rears). It has 2.73 gears and I'll be using it to replace the worn/noisy/leaky 2.56 geared 8.5" that's currently in my 77.
August 14, 2004 -- Tilt Column and Gauges
I removed the tilt steering column from the above mentioned parts car, cleaned it up, and gave it a fresh coat of semi-gloss black paint. I also removed the steering column, instrument panel, and old cracked dash pad from my 77 in preparation for some upgrades. The dash pad will be replaced by a good used pad I salvaged from another parts car.
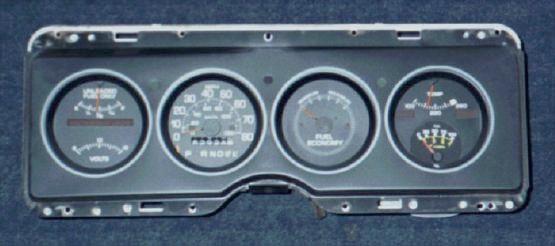
I purchased this gauge cluster on eBay. It's a factory "econominder" gauge package that was an available option in 1977 - 1979 Novas. It includes a voltmeter, temperature gauge, and a fuel economy (vacuum) gauge in addition to the speedometer. Strangely enough, it doesn't include an oil pressure gauge so I removed the clock (which didn't work anyway) and modified an aftermarket oil pressure gauge to fit the opening.
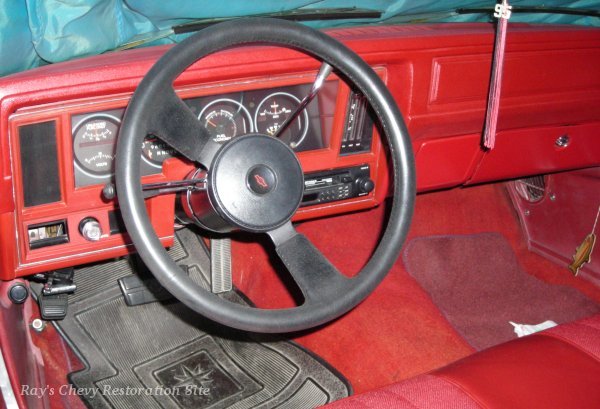
The 78 Nova tilt column was a direct swap into my 77 although I did notice that GM had changed some of the steering column threads to metric. That simply meant using the bolts from the 78 donor so they would properly thread into the column. Also, the connector for the ignition switch is oriented the other way around for tilt vs. non-tilt. The plugs on the wiring harness are the same though. It was just a matter of flipping them around the other way before plugging them into the switch. More information on the gauge cluster swap can be found on my 1977 - 1979 Nova Gauge Cluster Swap Guide. The steering wheel is from a 1988 Celebrity Eurosport and came with a red Chevy bowtie emblem that just happens to match the red interior. It was a direct swap onto the 78 column.

Here is the latest photo of the car. I plan to continue doing the body work a panel at a time so it may be a while before I finally get it ready to paint.
September 2004 -- Rear Axle
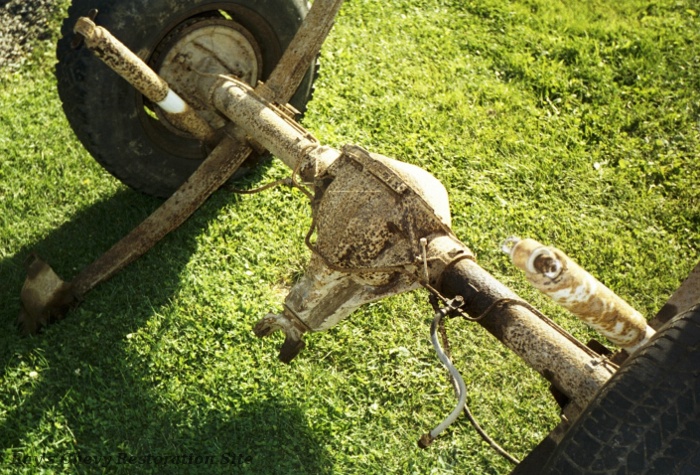
I pulled this 8.5" 10-bolt rearend from the above mentioned 78 parts car. The brakes appear to be the originals (still had the flat retainer nuts holding the drums). They're pretty well worn out so I'll be replacing them with the fairly new brakes currently on my 77.
I gave the rearend housing a good cleaning followed by a light sandblasting to remove the surface rust. I installed a new cover (they're still available from GM for under $20) and painted the whole thing with a couple coats of semi-gloss black POR15.
The brake lines on the rearend looked "okay" but since I already had them off for sandblasting and painting the housing I decided to replace them. I purchased a couple sections of 3/16" armored brake line (has the coiled wire covering like the originals) from the local CarQuest and used the old lines as bending templates. I also installed new wheel cylinders and a new flex hose.
I was originally planning on re-using the original rear leaf springs. They had appeared to be in good condition but when I unbolted them from the rearend I found that both main leaves were cracked right near the centerbolt hole. I also found both centerbolts rusted off. Rather than order and wait for a new set of springs, I salvaged a couple of good main leaves from the springs off the 78 parts car that donated the rearend and put the spring packs back together with some new centerbolts.
After completing the swap, I didn't notice a whole lot of difference going from 2.56 to 2.73 gears. However, the "new" rearend sure is a lot smoother and quieter ... no more "whirring" and "clunking" noises. I never did open up the old rearend to take a look, but it definitely had some worn parts because the pinion had a lot of free play before the axles started to move. And the pinion bearings were rather stiff too.
October 30, 2004 -- Fixed the Carburetor
I finally fixed the carburetor! Ever since I've owned the car it's had a sticky throttle that would catch at around 1000 to 1500 RPM. When I rebuilt the carburetor a few years ago, I discovered that the problem was a bent throttle plate that was catching on the throttle bore. I straightened it out as best I could but it didn't entirely cure the problem. I could never get the idle mixture set correctly either. I had to leave it a bit on the rich side or the engine had a tendency to stall when coming to a stop or going around a sharp corner.
A few weeks ago I came across another old 2GC carburetor while cleaning some junk out of the garage. So I took the baseplate off, cleaned it up, and swapped it onto the carburetor that's on the car. What a difference! No more catching/sticky throttle and it idles a lot smoother. The throttle response seems to have improved as well.
Winter 2004/2005 -- Trunk Lid
The trunk lid on my 77 has some rust starting to break through along the lower rear lip. My recently acquired 78 4-door parts car has a much better trunk lid. It is rust free but does have some dents and dings. So I removed the parts car's trunk lid and fixed it up over the winter. I'll swap it onto my 77 next summer.
- Continue on to Page 5 (July 2005 - May 2012 ... Quarter Windows and Trunk)
- Skip to Page 6 (December 2012 - present ... Roof, Windshield, and more Interior work)
- Return to my 77 Nova Page
- Return to Ray's Chevy Restoration Site Home Page
- © 1998 - 2026 Raymond McAvoy. All Rights Reserved.