Q - Why do the parking lights go out when the headlights are turned on ?
A - This is normal behavior on pre 1968 vehicles. When side marker lights were introduced in 1968, the parking lights were re-wired to stay on with the headlights. This is a safety feature that helps oncoming traffic see the vehicle better if one headlight is out. Older GM vehicles can often be converted by simply moving the parking light wire to a different terminal on the headlight switch (that terminal was used to power cab lights on trucks and is electrically connected to the tail light circuit so it stays on with the headlights).
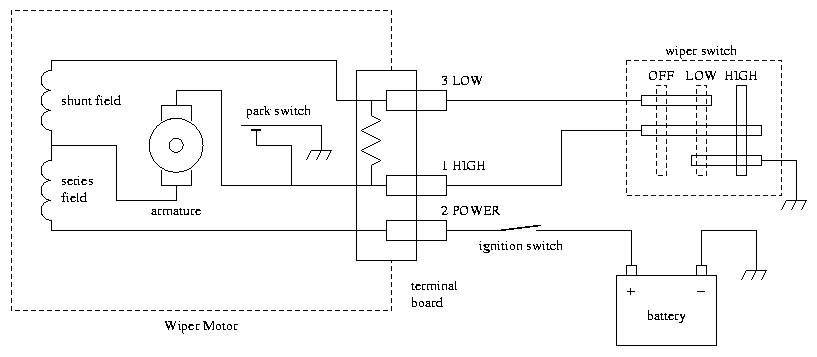
Q - How is the windshield wiper motor wired ? How can the circuit be tested ?
A - Single speed wipers were base equipment on most
early 60's GM vehicles. They have one (fused) power wire that is connected
directly to the wiper motor. This wire is live whenever the ignition
switch is on. A second wire connects the motor to the switch on the dash.
When the wiper switch is turned on, it completes the circuit to ground (the
dash). The single speed motor can be tested using the following procedure:
Two speed wipers with washers were available as optional equipment on early 60's GM vehicles. They became standard equipment in 1965 or 1966. This system still uses the same basic wiring principles as the single speed wipers. There is still a power wire that feeds the wiper motor whenever the ignition switch is on. Except now there are three wires going to the switch. The switch grounds one wire for high speed operation. Two wires are grounded for low speed operation. The third wire grounds the washer solenoid to activate the washers. Note that many '75 and later vehicles used a small electric washer fluid pump mounted to the reservoir instead of the older wiper motor driven pump.
There are also 3 types of 2-speed wiper motors. One is a non-depressed
park motor that is easily identified by its rectangular motor case. Another
is a depressed park motor that has a round motor case attached to the
gearbox at an angle. The third is a permanent magnet motor that has sort
of a rounded 6-sided motor case. The diagram below illustrates the
non-depressed park (rectangular case) motor. The washer has been omitted
for clarity. The depressed park (round case) motor uses the same wiring
concept except the terminals on the motor are arranged in a different order
(3 Low, 2 Power, and 1 High). The permanent magnet motor (used primarily
on 1978 & newer GM pick-up trucks) has separate terminals for the park
switch and therefore uses a different wiring setup. I'll add a diagram for
that later.
Testing the wiper motor independent of the switch:
The depressed park and non-depressed park 2-speed wiper motors can be bench tested independent of the dash switch by making the following connections:
If the motor operates normally in the above tests but not when installed on the vehicle then the probelm is most likely in the switch or maybe the wiring. Don't forget to check the fuse. The switch can be tested with an ohmmeter.
If the motor stops immediately when switched off (doesn't return to park position), first check the motor's ground strap. Since the motor is mounted on rubber cushions, it's grounded via a copper strap attached under one of the mounting screws. This is the ground for the park switch so the parking feature won't operate if the ground strap is missing, dirty, or corroded. If the ground strap checks out okay but the motor still doesn't go into park then the problem is most likely a worn out or dirty park switch. The park switch is located inside the motor's gearbox so some disassembly is required to check/clean the switch. I recommend consulting a good repair manual for the motor disassembly procedure.
Q - Where is the horn relay located ?
A - Many 1973 and earlier GM cars and 1966 and earlier pickup trucks have the horn relay under the hood. On most 60's vehicles it is located on the driver side of the radiator support. Some early 70's cars have the horn relay mounted on the firewall. In many cases a large terminal on the horn relay is also used as a junction block for constant feed power wires.
Starting in 1974 (cars) and 1967 (pickup trucks), the horn relay was moved to under the dash. These vehicles often used a separate junction block or factory multi-wire power distribution splice in the under-hood wiring for the constant power feed wires.
Q - What is the seat belt starter interlock system ? How can it be disabled ?
A - This system was installed on 1974 and 1975 model year cars. It prevented the car from starting if the driver and front passenger seat belts were not fastened. The system uses weight sensors in the front seat. There is also a control box mounted under the front seat and a relay/bypass switch mounted on the driver side of the firewall. The system can be disabled by simply unplugging the control box under the front seat.
The relay/bypass switch and associated wiring can be completely removed for a cleaner look. The system is tied in to the neutral safety switch circuit so a jumper wire will be required if the relay is removed.
Q - How do I wire up an aftermarket ammeter or voltmeter ?
A - Due to the hazards involved with wiring an aftermarket ammeter, I strongly suggest using a voltmeter instead. The (-) terminal on the voltmeter should be connected to ground. The (+) terminal of the voltmeter should be connected to a source that is switched on/off via the ignition switch. The "IGN" terminal on the fuse panel is a good place to connect the voltmeter. Heavy gauge wiring is not necessary since the voltmeter does not draw a lot of power.
Wiring an ammeter is more complicated. First, an ammeter must be selected that can carry enough current to meet the demands of the vehicle's electrical system. Then heavy gauge wire (capable of carrying that current) must be used to wire the ammeter. ALWAYS start by disconnecting the battery. The ammeter should be connected in series with the vehicle's entire electrical system (with the exception of the starter). On 60's GM vehicles, that can be done by tapping into the wiring at the junction block on the horn relay. First, locate the wire that connects the (+) battery terminal to the junction block. Remove that wire from the junction block and connect a heavy gauge extension wire to it. Make sure the connection is well insulated since it is connected directly to the battery with no fuse. Run the other end of the extension wire to the (-) side of the ammeter. Run another heavy gauge wire from the (+) terminal of the ammeter to the junction on the horn relay (to the same spot where the battery wire was removed). Again, be sure to make sure all connections are well insulated and that grommets are used to prevent wires from chafing where they pass through the firewall.
Starting sometime in the 70's the horn relay was no longer used as the junction block for power feed wires. The "BATT" terminal on the starter solenoid became the new junction point. It should have the heavy (+) battery cable connected to it along with another (smaller but still quite heavy) wire. Remove the smaller wire and attach an extension wire to it. Run the extension to the (+) ammeter terminal. Run another wire from the (-) ammeter terminal back down to the "BATT" terminal on the starter.