Ray's Chevy Restoration Site
Converting warning lights to gauges in a 1966 Chevy truck

This page will describe the conversion of my father's '66 Chevy truck from warning lights to gauges. This conversion involves replacing the instrument panel and wiring with parts taken from a donor truck with the factory gauge option. This conversion applies to 1964 - 1966 Chevy trucks since they all use the same instrument panel. All of the parts (with the exception of the cluster gauge itself) can be purchased as new reproduction and/or replacement parts. Replacement cluster lenses are available through many Parts Suppliers.
Parts Required for the Conversion
Differences in the Gauge vs. Light Wiring Harnesses
The Swap Procedure
The wiring harnesses from the parts truck were in okay condition but still
required a few repairs. This involved untaping the harnesses and inspecting
all of the wires for damage. Most of the wires were okay but I had to replace
a few that had been cut and spliced. I also had to replace a few corroded
terminals as well.
Since all of the parts trucks had 6 cylinder engines, I had originally planned on modifying the existing V8 harness by adding a wire for the ammeter. However, upon closer inspection, the existing harness wasn't in very good condition. So, I ended up modifying a 6 cylinder wiring harness to fit the V8. Actually it only involved re-wrapping the wires into a slightly different configuration (and shortening the wires to the coil).
The gauge cluster from the parts truck only required a bit of cleaning before it was installed. Swapping the temperature sending unit, and hooking up the copper oil line completed the swap from lights to gauges.
Important: Do not use water or a damp cloth when cleaning the gauge faces. The silk screened markings are water soluble and easily damaged. Instead, use a soft brush and/or low pressure compressed air to carefully remove dust.
Tachometer Wiring
In addition to the gauges, we also installed a factory tachometer that we found
in an old '66 Chevy farm truck. A good place to look for these is in larger
trucks (like 40, 50, and 60 series trucks). They used the same instrument
panel as the pick up trucks. Look for a tach from a truck with the same type
of engine as yours (6 or 8 cylinder) because they do not have a selection
switch like aftermarket tachs. The tachometer wiring is totally separate from
the rest of the wiring so installation is fairly simple. The tachometer's
ground is through the metal dash so there are only two wires to connect. The
power wire plugs into the fuse panel and the sensor wire is hooked to the
negative (-) terminal on the coil.
Update: LMC Truck now offers a tachometer conversion kit that includes a factory looking tachometer & wiring harness.
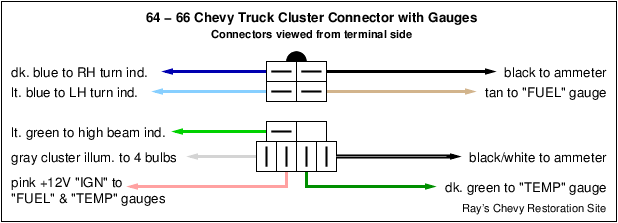
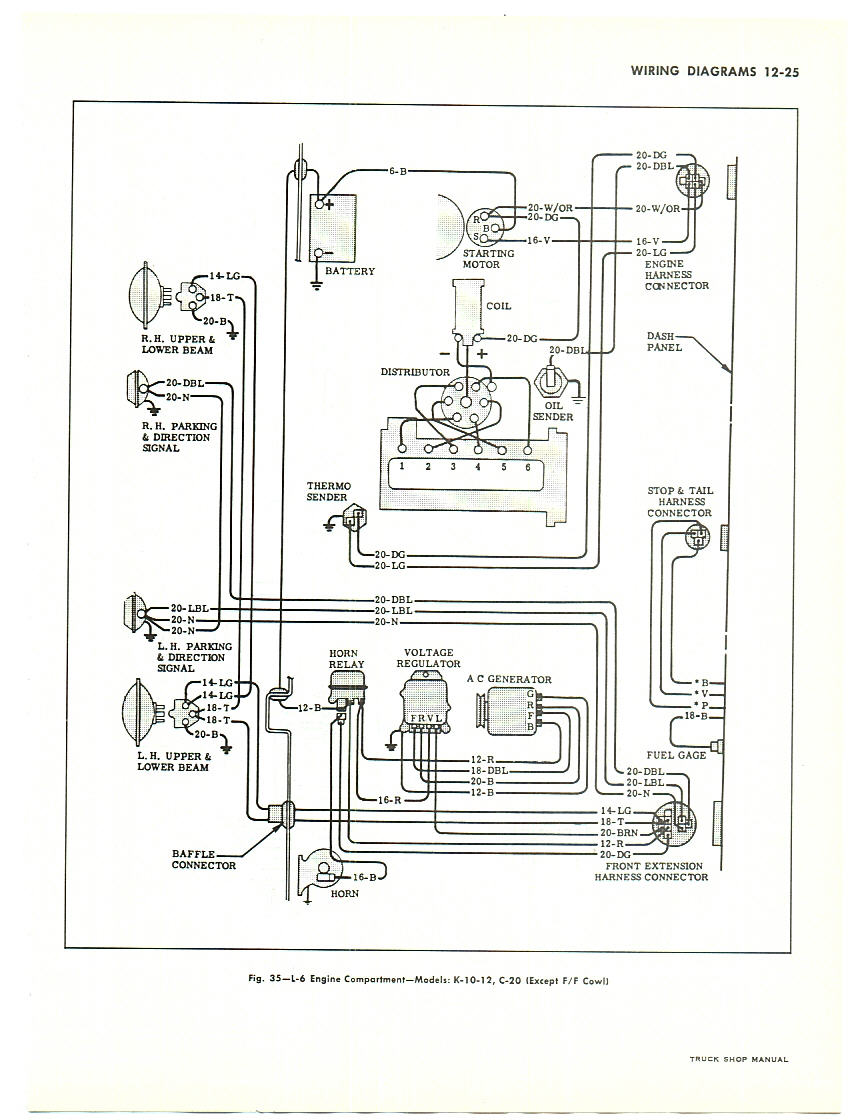
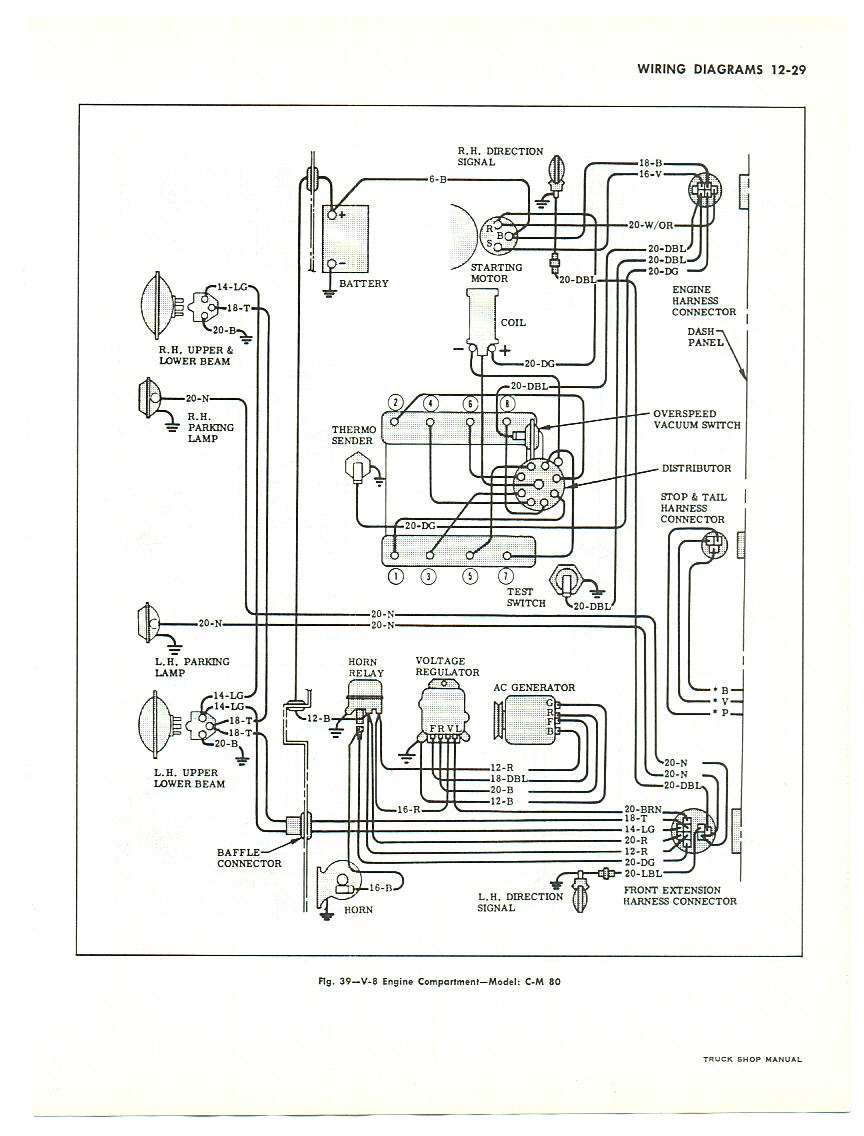
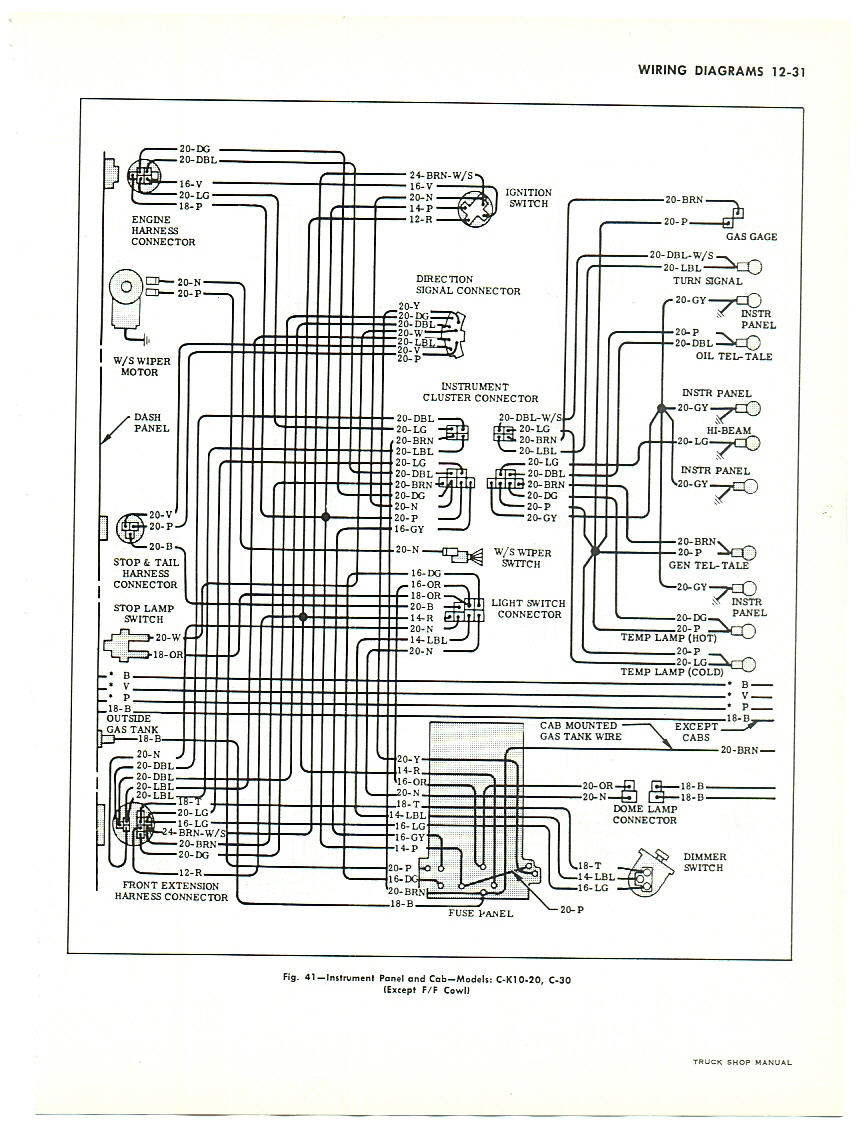
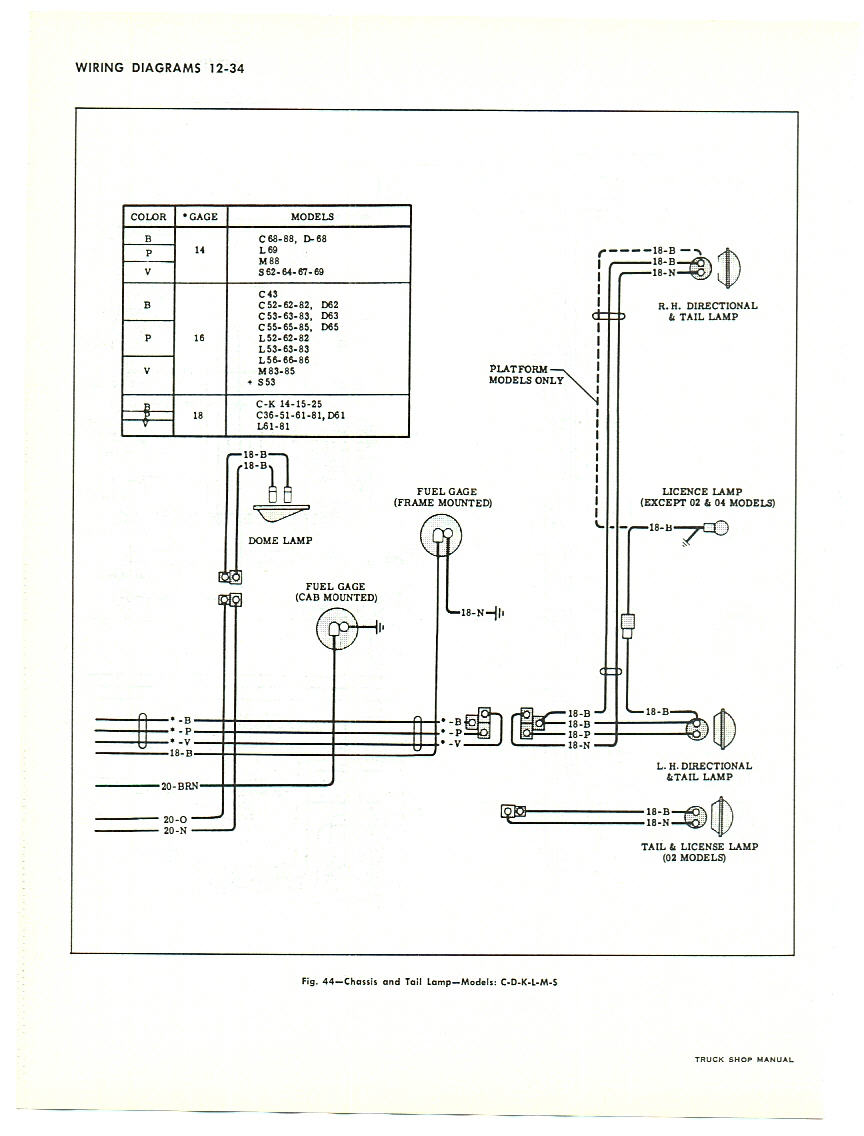
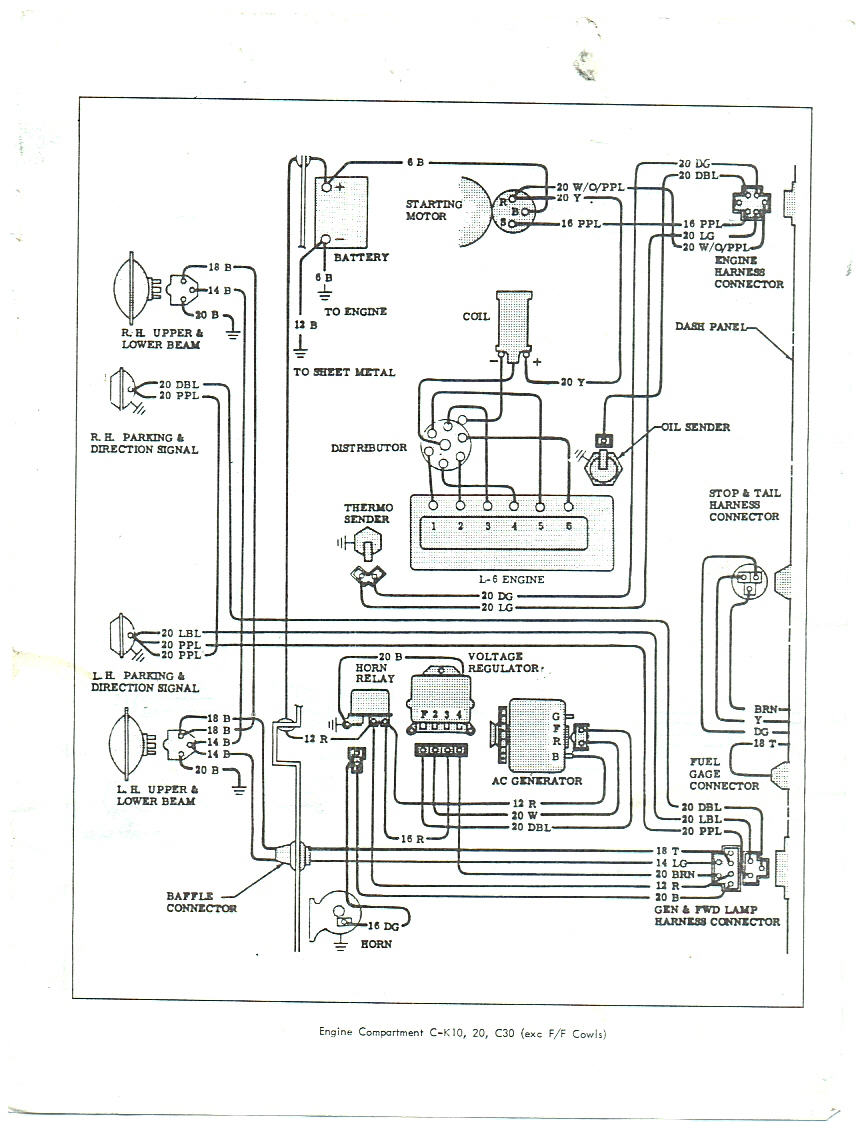
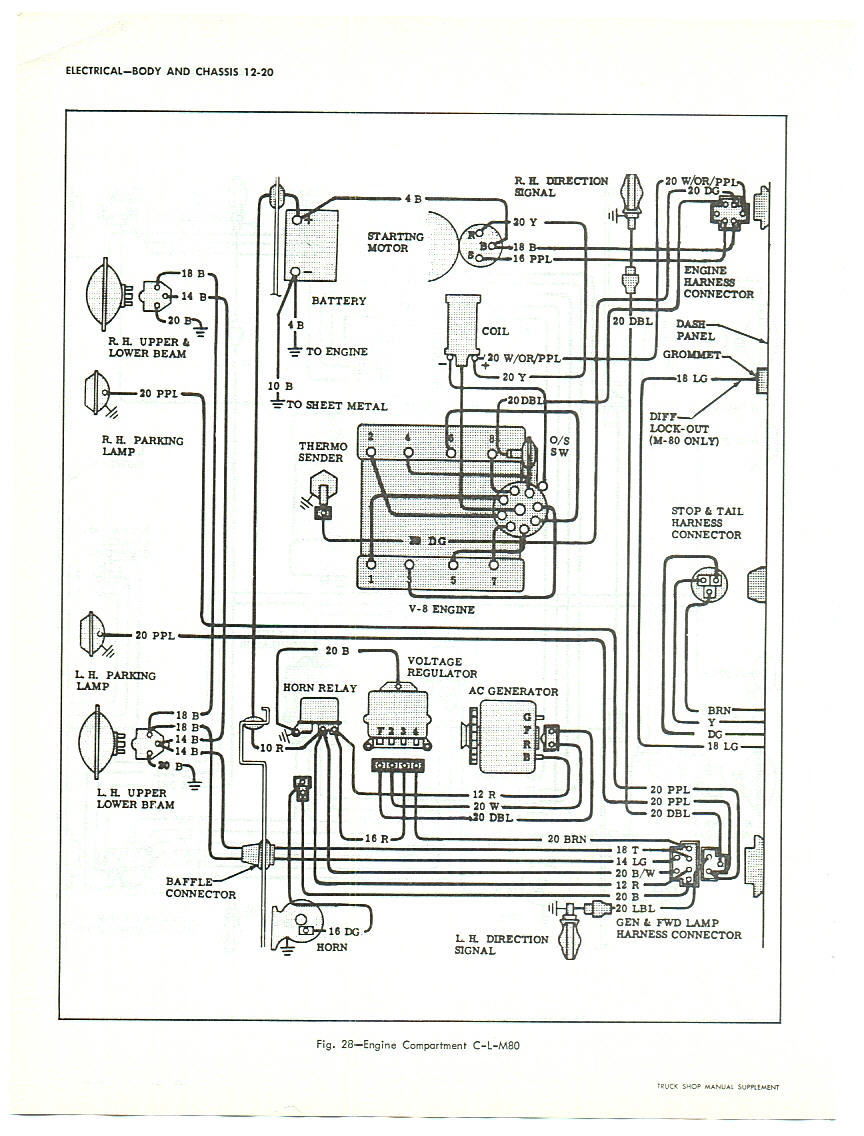
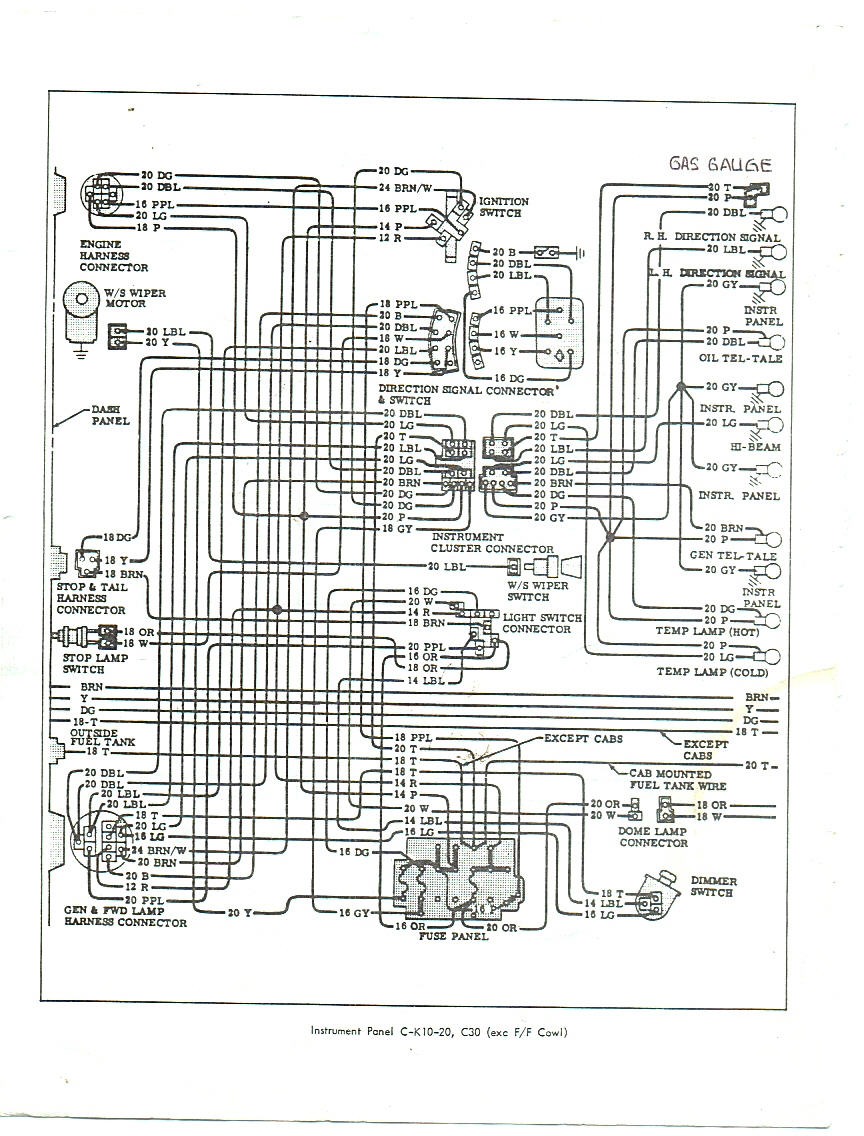
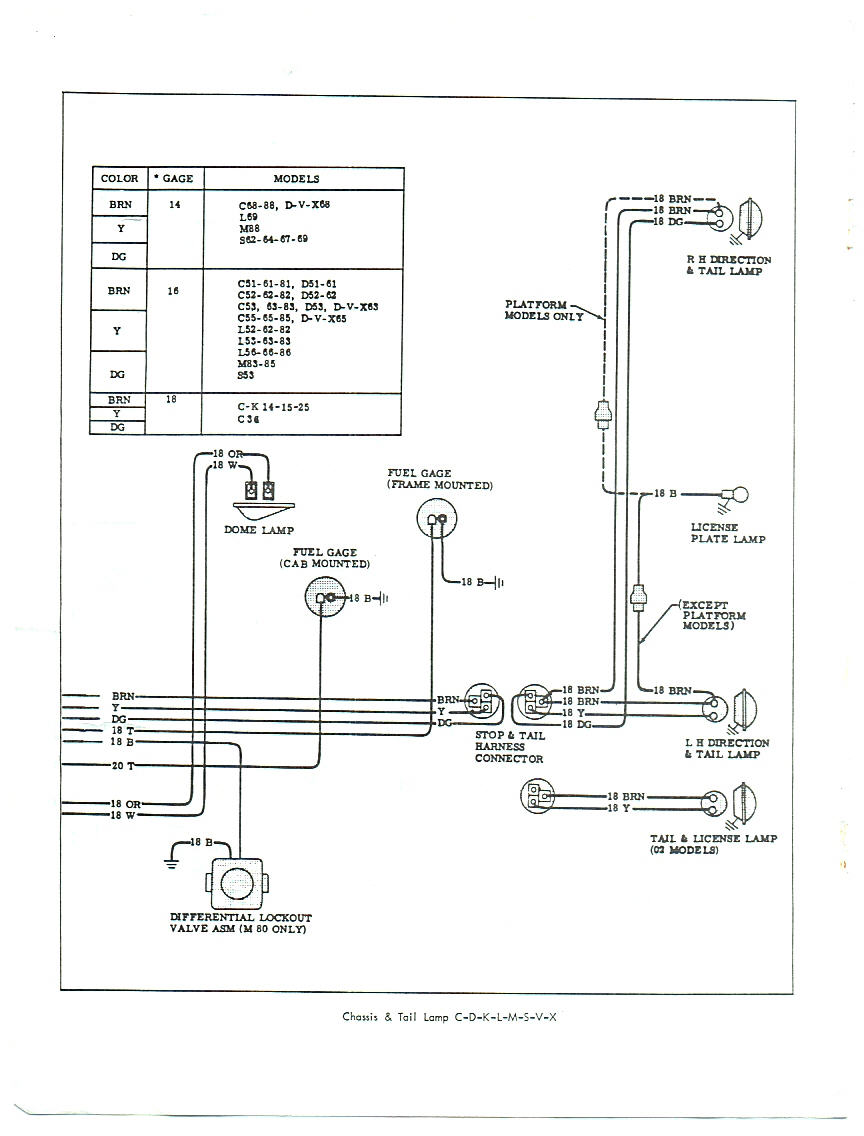
Factory Wiring Diagrams
Here are some 1965 wiring diagrams that illustrate the differences between the warning light and gauge wiring.
Please note that there are some differences (particularly in color coding) for other years. Here are some 1963 (very similar to '64) and 1966 diagrams that show those differences.
An Alternative to Replacing the Wiring Harnesses
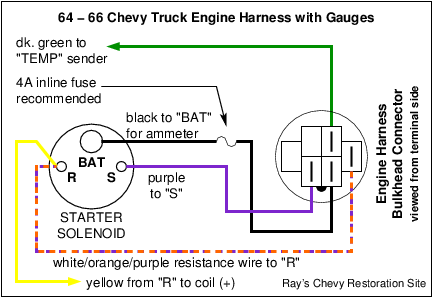
The swap can be done by modifying the existing wiring harnesses. Do this at your own risk. It will involve adding a few extra wires and un-hooking some unused ones. The oil sender wire and one of the temperature sender wires (dk green one) are no longer needed. Also note that you can't just plug the gauge style instrument panel into a wiring harness meant for warning lights. The plug will fit (physically) but some of the terminals have different uses and locations. The above wiring diagrams can be used to determine these differences. If at all possible I would suggest using the wiring from a parts truck (after making any needed repairs) or purchasing new wiring harnesses. Here's how the ammeter was wired in trucks with original gauges:
ALWAYS use caution when making changes to the wiring. Especially when wiring up the ammeter. If the ammeter is connected backwards it just won't read correctly (charge & discharge swapped). The danger lies in the fact that the ammeter is wired directly to the battery with no fuse. Adding a fuse to the circuit would be a great idea even if using a new wiring harness.
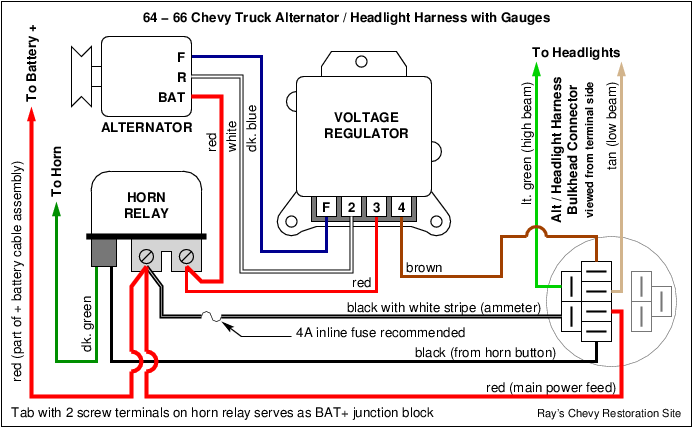
Unlike most aftermarket ammeters where the shunt is internal to the meter assembly, the ammeters in these trucks used the wire connecting the battery to the junction block on the horn relay as the shunt. Most of the current flows through that wire (the shunt) and only a small fraction flows through the meter. That makes it possible to add a fuse in series with this type of ammeter. I've labeled the potential fuse locations in the above diagram with an *. Since both wires are connected to the battery, fuses in both locations would be best. And since it's a shunt type meter 4A fuses will be large enough.
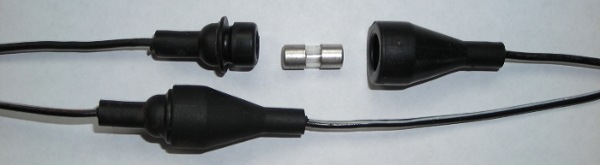
For a factory type appearance, fuse holders from a '67 to '75 GM truck (as pictured below) can be used. Or, weatherproof fuse holders for modern ATM "mini" blade fuses (such as NAPA #BK 7825332) can be used instead.
I've noticed that some earlier and later year GM trucks did use small 3 or 4A inline fuses in the ammeter wiring. I don't know why the '64-'66 trucks didn't have them from the factory.
Note: I am working on an update to this page that will include a step-by-step conversion procedure along with some new diagrams. I do not have that page ready to upload yet, but in the meantime here are some of the new diagrams I have drawn that show the gauge wiring.
