Ray's Chevy Restoration Site
HEI Distributor Conversion
This page describes the installation of a GM HEI (High Energy Ignition)
electronic distributor in my '74 Nova with a 350 small block. With the
exception of firewall clearance problems in various vehicles, this should apply
to swapping most any GM points type distributor to HEI. Some benefits from
the HEI swap include reduced maintenance, easier starting, and often a small
improvement in gas mileage.
Finding an HEI Distributor
There are a couple of choices here, new or used. If you go the used route as
I did, it's a good idea to re-build it. In addition, here are a few things to
note:
- '75 to '79 ('75 to '85 Canadian) used 4-pin modules.
- Some later models used a 5-pin module (for a knock sensor)
- Computer controlled engines used a 7-pin module
When replacing a points distributor, you should use a distributor with the
4-pin module. You could also use a distributor with a 5-pin module and replace
the module with a 4-pin one. That would require plugging the extra hole in the
housing where the connector for the knock sensor wiring used to be.
Distributors using 7-pin modules can not be converted to non-computer controlled
use since they do not have advance mechanisms (they use the computer to control
the advance).
Also note that different GM divisions used distributors with different
shafts and gears. So make sure that your used distributor came from the same
type of engine that you plan to install it in.
Rebuilding a Used Distributor
If you choose to re-build a used distributor, here's a few suggestions/ideas:
- The drive gear is held on by a roll pin -- carefully drive out the pin
with a drift punch to remove the gear.
- Once the gear is off, the shaft should slide out. If it doesn't, there
is probably some rust or sludge build up on the shaft. Soak with
penetrating oil and work carefully to avoid damaging the bushings.
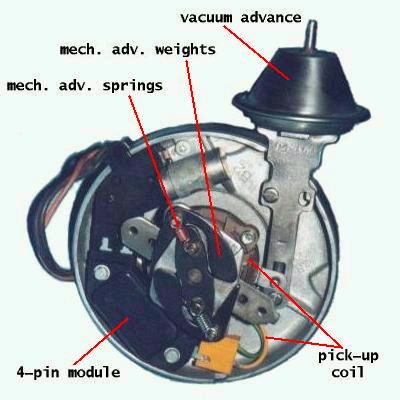
- With the shaft out, the pick-up coil and pole piece assembly can be
removed by carefully removing the snap ring from the upper end of the
bushing.
- Once the distributor is fully dis-assembled, thoroughly clean
everything. Note that there is a lubrication well surrounding the upper
bushing. Carefully remove the plastic cover and clean out the old (usually
dried up grease) and replace it with new grease. I use wheel bearing
grease.
- Inspect for damage (particularly the pick-up coil & wires) and replace
parts as necessary.
- Slide the shaft into the housing and check for excessive play between
the shaft and bushings. New bushings (or another housing with better
bushings) may be necessary.
- Note that most gears have a little dimple on one side that should be
aligned with the rotor when the gear is re-installed.
- After re-assembly of the gear on the shaft, slide it end-to-end and use
a feeler gauge to check for excessive end play. Use shims as necessary to
get the axial end play near 0.015".
- Also check the mechanical advance and make sure that it is working
freely.
- The factory advance in HEI distributors used very stiff springs
resulting in a very slow mechanical advance. Pick up an advance curve kit
that contains various springs so you can experiment with re-curving the
distributor. The weights that come with many kits are of questionable
quality. I prefer to re-use the original GM weights.
- Apply thermal heat sink compound (not dielectric grease) to the
underside of the module before screwing it to the distributor housing.
Many new modules come with a packet of heat sink compound. It's also
available at Radio Shack if you're re-installing a good used module.
- Finally, finish the re-assembly with a new rotor and cap.
Rebuild Parts
The following is a list of part numbers for items that may need to be replaced
when rebuilding a distributor. These parts are available at most any auto
parts store. The part numbers listed are for the 4-pin module Chevy V8
distributors. Parts listed in red should
definitely be replaced when rebuilding an old distributor. Parts listed in
blue should be tested and replaced if necessary.
And parts listed in green are usually only
replaced if missing or obviously damaged. Part Number Source: Standard
Ignition Engine Management Parts Guide Catalog.
- Pick-up Coil/Pole Piece Assembly
= AC Delco #D1907, or Standard Ignition #LX-302
- Module = AC Delco #D1906, or
Standard Ignition #LX-301
- Cap = AC Delco #D336, or Standard
Ignition #DR-450
- Rotor = AC Delco #D431 or D433, or
Standard Ignition #DR-318
- Coil = AC Delco #D523 or D530, or
Standard Ignition #DR-31
- Coil Ground Strap = Standard
Ignition #DR-31A
- Coil Dust Cover = Standard Ignition
#DR-443
- Capacitor (Radio Noise Suppression)
= AC Delco #D211, or Standard Ignition #RC-3
- Wiring Harness Assembly (connects module to
coil and includes the capacitor) = Standard Ignition #RC-4 (6.5"
long wires), or Standard Ignition #RC-5 (3.5" long wires).
- Vacuum Advance = see table below:
Standard Ignition
Part Number |
Advance Starts
at ____ "Hg |
Maximum Advance |
| * Degrees |
at ____ "Hg |
| VC-202 |
4-6 |
12 |
11.3 |
| VC-211 |
3-5 |
9 |
11-13 |
| VC-233 |
3-6 |
10 |
9-12 |
| VC-234 |
2-4 |
8 |
6-8 |
| VC-235 |
2-4 |
10 |
12-13 |
| VC-236 |
5-7 |
7.5 |
11-12.5 |
| VC-240 |
4.5-6.5 |
13 |
11-13 |
| VC-242 |
2-4 |
10 |
6-9 |
| VC-246 |
3-5 |
9 |
6-8 |
| VC-247 |
7-9 |
5 |
12-14 |
* Note: these numbers are Distributor
Degrees (double for Crankshaft Degrees)
Physical Installation
- Note the position of the #1 spark plug wire on the existing distributor.
Mark it on the distributor body (just below the edge of the cap) using a
small piece of tape, magic marker, dab of paint, etc.
- Remove the old distributor cap and rotate the engine in it's normal
clockwise direction until the distributor rotor points towards that mark.
The best way to do this is by turning the engine over by hand. There is a
special tool available that grabs the teeth of the flywheel/flexplate and
allows you to easily turn the engine by hand. Or you can use a socket and
breaker bar to turn the large bolt in the center of the harmonic damper
(note: some early engines did not have a bolt in the center). In any case,
removing the spark plugs will make the engine much easier to turn by hand.
- When the distributor rotor is pointing at the #1 mark you made on the
distributor body, the timing mark on the harmonic damper should also be
lined up (or very close to lining up) with the "zero" mark on the timing
tab. In this position, piston #1 is at TDC (top dead center) on the
compression stroke.
- Now turn the engine backwards (counterclockwise) a small amount so the
timing mark is at 8 to 10 degrees before top dead center. This isn't
absolutely necessary but I find it makes it much easier to get the initial
timing very close to 8 to 10 deg BTDC when installing the new distributor.
Now is also a good opportunity to check your engine's timing chain for
slack. Watch the rotor closely when you start to rotate the engine
backwards. It should start to move as soon as you start turning the engine.
If you can turn the engine more than 4 degrees or so (as indicated on the
timing tab) before the rotor starts to turn then you should consider
replacing the timing chain.
- Loosen the distributor hold-down bolt. A special 9/16" offset wrench
is available for this if you have a hard time reaching the bolt with a
regular wrench. With the bolt loose, slide the hold-down tab back away
from the distributor and pull the distributor straight up out of the
engine.
- Clean off any gasket material that may have stuck to the engine being
careful not to drop any down in the distributor hole.
- It is possible to use any terminal on the distributor cap as #1.
However, using the factory #1 position will allow the use of pre-terminated
plug wire sets meant for a later year engine. The factory position of the
#1 terminal on HEI distributors in Chevy V8 engines is the 2nd terminal
away (going clockwise) from the "snout" on the side of the cap.
Temporarily install the new cap on the HEI distributor and mark the location
of this terminal on the distributor body just like you did with the old
distributor in step 1. Also make a second mark that corresponds with the
position of the "snout" on the side of the cap.
- If not already done, install a new rotor on the HEI distributor.
Rotate the shaft so the rotor is pointing roughly towards the second mark.
This is back a few degrees from the #1 mark and will help compensate for
the turning of the distributor shaft that occurs during installation as a
result of the gears' angled teeth.
- Orient the distributor body so the mark corresponding to the cap
"snout" position is pointing straight off towards the driver side of the
car. Look at the bottom of the distributor shaft and note the position of
the tang that engages with the slot in the oil pump driveshaft.
- Shine a light down into the distributor hole and note the position of
the slot in the oil pump shaft. If necessary, use a long screwdriver to
turn the oil pump shaft so it will hopefully line up with the distributor.
- Place a new distributor gasket on the engine and carefully lower the
distributor into place with the body & rotor positioned as described in
steps 8 & 9. When the gears start to engage, the rotor will start to
turn clockwise due to the gears' angled teeth.
- Hopefully, the distributor will go all the way in and the rotor will
now be pointing close to the #1 mark you made on the body.
- If the rotor is off from the #1 mark a tiny bit, you can rotate the
distributor body to compensate. But if the rotor significantly off the
mark, pull the distributor back up enough to disengage the gears and turn
the rotor a little in the necessary direction. Lower the distributor back
in.
- If the distributor won't go all the way down in, the slot in the oil
pump drive shaft probably isn't lined up with the distributor. Some
people recommend "bumping" the engine over using the starter to align
the distributor with the oil pump and allow the distributor to drop all
the way in. I prefer to pull the distributor back out, rotate the oil pump
shaft a little with the long screwdriver, and put the distributor back in
again. This can sometimes take a few tries.
- Once you have the distributor installed (fully seated) with the rotor
pointing at the #1 mark, put the hold-down back in place and snug up the
bolt. Leave it loose enough to allow the distributor body to be turned but
tighten it enough so the distributor body won't turn freely.
- Install the new HEI cap, coil, and coil cover. Install the #1 spark
plug wire connecting it to the terminal indicated in step 7. Install the
rest of the spark plugs following the firing order (1-8-4-3-6-5-7-2 on a
Chevy V8). So the terminal right next to #1 (going clockwise) gets
connected to the #8 plug. The next terminal (going clockwise) gets
connected to the #4 plug and so on.
- Plug the 3-wire connector from the distributor body into the "snout"
on the side of the distributor cap. Plug your new +12V supply wire
(see "Primary Wiring" section below) into the terminal labeled "BAT" on
the cap. Plug your tachometer wire (if equipped) into the terminal labeled
"TACH" on the cap.
- Leave the vacuum advance disconnected and plug the vacuum hose comming
off the carburetor. Connect a timing light to the engine and start it up.
Following the steps above should have your initial timing very close to 8
to 10 deg BTDC and allow the engine to start right up.
- Check the timing with the timing light and adjust if necessary by
slowly turning the distributor body clockwise to retard or counterclockwise
to advance. Tighten the hold down bolt and re-connect the hose to the
vacuum advance.
Clearance Issues
Since HEI distributors have a larger diameter body and cap than points
distributors, there can be firewall clearance issues on V8 engines with the
distributor at the back. On my '74 Nova with a small block Chevy 350, there is
about 1/4" clearance between the HEI cap and firewall. I didn't have to dent
the firewall for clearance but I have heard stories from people who did have to
modify their car's firewall to clear an HEI distributor. In any case, be sure
To measure your car to see if an HEI will fit. The HEI is about 1-3/8" larger
in diameter than a points distributor. So it will be about 11/16" closer to
the firewall.
On unibody cars such as Novas, deteriorated body to subframe mounting
bushings can allow the front subframe to tilt and reduce the distributor to
firewall clearance. Simply replacing these bushings may give the added
clearance necessary to fit an HEI distributor without having to dent the
firewall. It may also be possible to gain a little extra clearance (maybe
1/8" or so) by re-adjusting the body to subframe alignment so the subframe and
engine sit about 1/8" further forward in relation to the body/firewall.
The air cleaner housing may also present a clearance issue on V8 engines
as well. My solution on my '74 Nova was to use an air cleaner housing from
a later year car. The one I found (off a mid 80's Caprice I believe) has a
slightly different snorkel end (oval instead of round) but it clears the
HEI cap.
Primary Wiring
The power supply for the breaker point distributor is routed through a
resistance wire to drop the voltage and prevent damage to the points. A bypass
wire was also used to supply the distributor with a full 12 volts at startup.
On the other hand, an HEI distributor requires a full 12 volt supply. This can
be accomplished by replacing or bypassing the resistor wire. In order to
achieve a factory look, I used a supply wire from a donor vehicle (an '80 Chevy
truck). To install this wire, I carefully removed the terminal end from the
bulkhead connector on the truck. Next, I removed the resistor wire terminal
end from the bulkhead connector on my Nova. Then, I just plugged the wire from
the truck into the bulkhead connector on my Nova. After taping up the end of
the resistor wire and routing the new wire inside the wire loom, I was finished.
Here are a couple diagrams illustrating the wiring of the points and HEI
ignition systems. The first diagram shows a typical stock points system. The
second diagram shows where the wires go when converting to HEI. Note that the
new HEI power wire can be connected to the bulkhead connector as described in
the above paragraph, or it can be routed to the "IGN" terminal found on most
fuse panels.
Wiring for Typical Points Ignition System:
Wiring for Conversion to HEI Ignition System:
Another important issue is the combination of voltage regulator and HEI module
that you are using. If you have a mechanical regulator (stock on pre-71), you
may have problems with burnt out HEI modules. I've heard that many replacement
HEI modules (especially the inexpensive ones) do not have built-in over voltage
protection. To prevent problems, either use GM (or other quality) HEI modules,
or change to a solid state voltage regulator.
Secondary Wiring
With the addition of the HEI distributor, the spark plug wires and spark plugs
will also need to be changed. A set of plug wires meant for a 1975 or newer
version of your car's engine will often be a direct fit. Note: on small block
Chevy V8's using "rams horn" exhaust manifolds, order a set of plug wires for
a 75/76 Corvette since these cars had HEI with the "rams horn" exhaust
manifolds. Spark plugs should be changed (or re-gapped). For example, the
350 in my '74 Nova used AC #R44T plugs so I installed a set of R44TS plugs
which have a larger gap for use with HEI. I set the gap to 0.045" which is
common for the majority of HEI ignition systems.
Firing Orders
| Chevy Inline 6 |
1-5-3-6-2-4 |
| Chevy V8 (SB & BB) |
1-8-4-3-6-5-7-2 |
| Pontiac V8 |
1-8-4-3-6-5-7-2 |
| Oldsmobile V8 (pre '65) |
1-8-7-3-6-5-4-2 |
| Oldsmobile V8 (post '65 SB & BB) |
1-8-4-3-6-5-7-2 |
Buick V8 (pre '66)
(264, 322, 364, 400, 401, 425)
(even left bank, odd right bank) |
1-2-7-8-4-5-6-3 |
Buick V8 (post '64)
(300, 340, 350, 400, 430, 455)
(odd left bank, even right bank) |
1-8-4-3-6-5-7-2 |
Return to Technical Information Page
Return to Ray's Chevy Restoration Site