This page describes some tips and procedures of installing reproduction side trim on a 1963 Impala SS. This page should be applicable to all reproduction side trim since most parts vendors sell trim from the same manufacturer(s). For reference, the trim used here was purchased from Impala Bob's.
Front Fender Trim
These pieces are good quality reproductions. Since the new trim does not come
with retaining brackets (metal strips w/3 studs) the old retainers will have to
be reused.
This trim is available only in an Impala (white painted center) version. For use on an SS, the engine turned aluminum inserts are available separately. These SS inserts must be glued to the Impala trim with a suitable adhesive. We found that 3M Plastic and Emblem Adhesive works well for this.
Door Trim
These pieces are excellent high quality reproductions. They come complete with
all necessary mounting hardware. The mounting hardware consists of plastic
inserts and screws for the ends along with metal push-in spring clips for the
center -- exactly like the originals.
Unlike the front fender trim, the door pieces are available in both Impala (white painted center) and Impala SS versions. The SS version comes with the aluminum "swirl" inserts pre installed eliminating the need to glue them in place.
Like the front fender molding, the quarter panel trim only comes in an Impala version (white painted center) and the aluminum SS inserts must be glued in place. Since the SS inserts do not come pre installed, the "IMPALA" lettering is not pre installed either. The lettering kit we used was a high quality reproduction made by Trim Parts. However, the added thickness of the aluminum "swirl" SS inserts made some of the studs on some of the letters too short to peen the ends. So instead we installed those letters using the same 3M emblem adhesive as we used on the inserts.
In addition to installing the aluminum SS inserts and "IMPALA" lettering the
quarter panel trim also requires a few modifications in order to properly fit
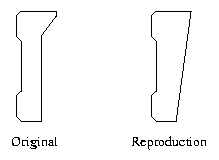
the contours of the car. A quick comparison between the original and
reproduction trim reveals that the original has a "V" contour on the back side
to fit the car while the reproduction trim is flat on the back. Re-creating
this contour on the reproduction trim requires some careful cutting and bending
on the ends of the trim. Here is a sketch (not to dimension) showing the
differences in the trim:
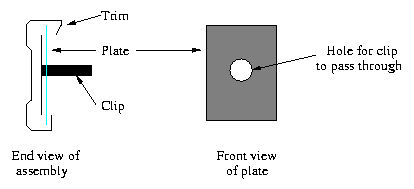
Finally, the "lips" on the back side of the reproduction quarter panel trim
are not quite as wide as they are on the original trim. This creates problems
with some of the clips. The narrower "lips" are not wide enough to hold the
original (or reproduction style) clips in some areas. In order to fix this, we
cut some rectangular plates of sheet metal, drilled holes in the centers, and
slipped them over the clips. These plates effectively widen the grip range of
the clips and allow them to hold on to the narrower "lips" on the back of the
reproduction trim. And these plates are not visible once the trim is installed
on the car. Here is a sketch (not to dimension) that illustrates the
construction and placement of these plates: